

In 2021 there is nothing more important than having your business’s presence on the internet.
We all want our business’s presence on the internet. However, the problem for most of us is your inability to do this ourselves.
For years, content management systems, aka CMS, have helped business owners manage our websites, but not many of us know that today’s CMSs are more than just website management tools.
Today’s CMS are the tools that help anyone from a successful freelancer to a small business succeed online by quickly creating and managing a website on their own.
I will keep the article – how to create a complete website using wordpress for some other day. Nonetheless, I will cover How to set up a wordpress blog without coding in this comprehensive yet straightforward step-by-step tutorial.
WordPress, the most popular Content Management System globally, has designed a system that makes setting up your WordPress website almost as easy as setting up your Facebook or Instagram account.
There are a few things that go into setting up a WordPress website. The Steps that I will be discussing in the blog are outlined below:
Part 1: Setting up a website Hosting
Part 2: WordPress Installation
Part 3: WordPress Initial Configuration
Part 4: WordPress Appearance
Part 5: Well Done on Creating your WordPress Website
Part 1: Setting up Hosting
Part 1: Setting up a website Hosting
Think of hosting as a place where a website stays. Hosting space is a home for a website.
There are a couple of things you need to know when you set up hosting. For starters, not all hosting websites are equal. Now I won’t spend the following 1000 words talking about the ones to avoid, but I will tell you what you can expect from wordpress hosting.
One of the essential points about wordpress hosting and setup is that wordpress setup on hosting does not require any coding. The lack of coding skills needed is a game-changer for me as I am not an active coder, and any place with a hint of coding makes me jittery.
Signing Up:

Signing up with a hosting provider is simple. All you must do is select the starter’s pack offered by the hosting and follow the prompts, which will take you on the simple journey of choosing your package and setting up your domain name.
Starting with the most affordable package might be the best option for you (note: there are packages as low as 5 $ / month for a basic wordpress hosting).
To demonstrate the working of a hosting website, I have used Bluehost as an example.

One of the first steps to selecting a hosting space is to choose your domain name. Now, selecting a domain name is an essential part of setting up a website. Those of you who are new to the “website lingo” – A domain name is the name address or URL(Uniform Resource Locator) that users on the internet will type into the search bar to connect to your website directly.
In layman language, a domain is the “link” that you will share to get somebody to directly link to your website from anywhere, including but not limited to your social media.
Part 2: WordPress Installation

Once you’re all signed up and set up, every hosting will have a one-click install WordPress. Think of a one-click install as a button click to get your hosting setup.
Click the button, and within a few minutes, your wordpress hosting is all set up.

Included in the email:
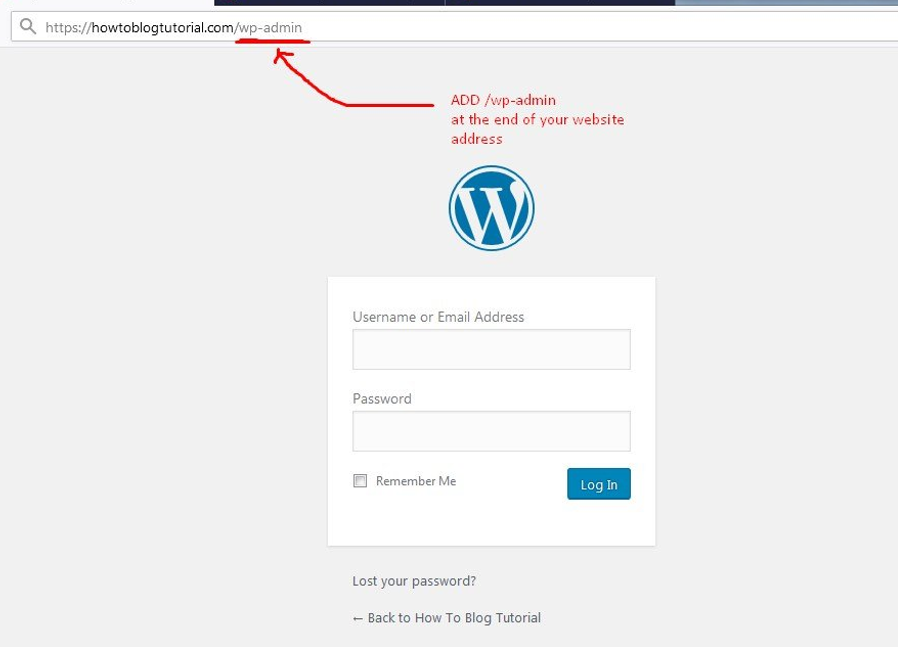
E.g., WordPress URL – YourWebsite.com/wp-admin
The “your website” part will have to be replaced by your selected domain name.
You will also receive the above information in the email you enter above. Please ensure that you save the information for future reference.
Now, your domain name has a house to stay. All you got to do is now design the house (in the wordpress language, build the pages and posts).
Choosing a Theme:
In addition to the signup information, you will be prompted to set up a “Theme.” Think of a theme as a colour theme of your house that you have purchased. Like a place, your website needs a structure—a structure around which the website will be set up.
Good News is WordPress being an open-source community with a plethora of themes, provided free by the good Samaritans working to make wordpress a wonderful community.
You – My friend is spoilt for choices 😉.
At your discretion, select a theme that you like best; Do not get overwhelmed by the choices available. WordPress allows you to change the themes as and when you want. The themes are more like the clothes you wear (daily) than the paint of your house. Change it when you want it.
As soon as you select a theme and click submit, you will be provided with the website URL, which will provide you with the login page.
The website URL will take you to a login page with looks similar to the image below.
It is here where you will log in with the credentials you set while creating the installation.
Log into the back office:
When logged into the backend, you will be presented with a WordPress Dashboard set up into an easy-to-use format.
An example of how the wordpress back end, aka admin panel, looks, is:

Once you have logged into your website’s backend, your next step is to start the website building process by amending some of your website’s most important data.
How do you do that?
Well! All the answer to updating a wordpress website and getting it internet ready lies in the bunch of options you see on the left-hand side menu.
To answer the above question accurately, navigate to the Settings Tab. Click on the Settings Tab, followed by the “General” sub-heading, which can be found under settings.
Part 3: WordPress Initial Configuration

Time to let internet users know the title of your website by filling in the above information.
Setting up a website’s Title and Tagline is a vital part of creating any WordPress Website. These two settings will decide on how your site is identified by name (Title) as well as its most brief description or motto (Tagline).
These are also two of the most prominent SEO(Search Engine Optimisation) features in any WordPress website and will be used by Search Engines such as Google to Index and help internet visitors find your website and its content.
Since I have you in the settings section, how about, I introduce you to something interesting?
Did you know that you can design the structure of your website’s web URLs from the wordpress admin panel?
It is a super cool feature that allows you to have better control over your website and allows your website to be more user-friendly and google friendly.
The URL Structure setup is done by a feature referred to as Permalinks. Permalinks are the “URLs” for your blog posts. When you start a wordpress website, the default URL structure is a bit of an unstructured mess that is not easily daintified by google.
To elaborate further, the default URLs look like weblink.com/?p=…. They are not “cool” to look at from an end-user and google’s perspective.
They are not easy to remember from a user’s point of view and are not SEO friendly as they do not aid search engines in locating your website.
I recommend that you change the default Permalinks of the WordPress website.

Changing the Permalink Setting to the new format will automatically turn your blog post’s name into the URL for this Post on your website. A practice that will also aid in content marketing as easy-to-understand links are known to get better content.
Besides, the weblink is better SEO optimized because the suspected keywords for the blog will be located directly in the blog URL. The practice facilitates Google in the indexing process and encourages more people to visit your website, increasing its popularity and overall rank on Search Engines such as Google.
Part 4: WordPress Appearance
When we all start working on wordpress, we usually start with the default theme. However, there is much more to wordpress in selecting a theme than just using a default theme.
Luckily for us all, several WordPress themes can be applied to your WordPress website directly within the WordPress backend.
When you start, you can experiment by using free themes. However, to get advanced functionality and better support, I recommend shifting to a premium theme. The premium themes are designs that come with paid-for additional features like email optins, AMP view (for google mobile optimisation), social media features, etc.
Sky is the limit when it comes to achieving the desired output using paid wordpress websites. However, we are going to begin your build with a theme that will not cost you anything and still looks great.
*Reminder: Premium themes may be purchased and installed via the WordPress Back end. Premium theme websites include:
Envato Theme Forest – www.themeforest.net
You may install these themes via the Settings Located in Appearance – Themes – Add New. Once purchased, theme files will become available to you, and they may be downloaded and installed here.

This same button may also be used to search for themes within the WordPress Back end. You may also choose from one of the pre-installed WordPress themes.
The latest of which will likely be a theme named the newest year, e.g., The Twenty-Twenty Theme. Previewing and Activating the Theme you like the most is – as simple as clicking on the desired theme. Installing the theme with the Install button and activating it by clicking it once more by selecting the activate button.
Your Active Theme Will Appear as demonstrated in the image below:

Let’s take a short break and celebrate the milestone of creating a functioning WordPress website!
A website that is your online presence.
Before you move on to the next step – you may need to decide whether you want a “static” display page or not.
A static page is a setting that some themes may force, but there will still be an option available to you if you do not wish to keep it.
The selection between the two options is a relatively simple one. When people who type in your URL navigate to your web page, will they be greeted by:
Your Latest Posts OR
Your Static Page
Your Latest Posts are another way of showing the list of latest blogs.
Unlike a Static Page, this page is not adjustable by the user(you), and it will be defaulted to take you and your readers to your designated blog page, which WordPress creates during the creation of your website.
The latest posts option is perfect for blogging as the ever-changing and updating of the homepage tells Googles indexing that there is consistent movement on the page, which increases the SEO score and, ultimately, the website’s overall ranking.
Your Static Page is opposite to your Latest Posts Option, as it provides a static homepage that will only update if you make the revised page amendments. The feature is perfect for portfolio websites or news websites as the static front page can be customised to show a lot of dynamic content like a banner, news scroll, portfolio, etc.

The above options can be selected under Settings – Reading. The settings in question are the difference between “Your Latest Posts or A Static Page.
Decorating:

Once your theme has been selected, you will have the opportunity to customise any of the settings your theme allows. The settings include options such as the Colours of page elements (top bars and menus) all the way to the “favicon and logos.”
The options will be used to identify your website. To use the above option, head over to Appearance – Themes and hit the Customise button to get started editing your website’s look and feel.

Please note – the options are in the form of a left-aligned control panel that displays next to your live website.
You can make changes to the various elements on the go by using the editable icons highlighted in a blue circle within the above diagram.
Please note that not all themes operate in the same way as what you saw on the above screenshot, but they are fundamentally the same. You should have no trouble adjusting the information found within the customisation settings.
Adding Pages:

Adding a NEW page to your WordPress website is an easy job.
All you need to do is – head over to the Pages tab. The pages tab is located in the left-aligned bar of the WordPress Back end.
It is here that you will be able to create new pages, name them, and select something called a default template for them.
The feature allows you to switch over to the live view and Customizer, where you will be able to edit the web page’s look and feel.
However, you may add the relevant images and text for the Web page directly into the page information blocks identified within the image provided above.
Adding Menu Items:

The Menu in any website is the navigation bar, by which you and your viewers will navigate your website content based on category another way you wish to divide your WordPress website e.g.

By adding to the Primary Menu, you will be adding to the top navigation bar within your website. Some essential pages may include a Home Page, About Page, Blog Page, and Contact Page.
Please be advised that they must be created as described in the previous step to add these pages.
Adding Posts:

Last but certainly not least is one of the essential pieces to any blog website – Post.
Posts are the Blog Posts that will populate your Blog Feed and increase your website’s SEO ranking by increasing the number of unique keywords to increase your website’s ranks.
When writing these posts, it is essential to include a Title and a minimum body copy/text of 301 words.
The reason for this number is because Google and other Search Engines will not recognise Blog Post pages with less than this number of words, which will render your efforts to rank higher on Google useless.

Add a featured image to your blog for your website to generate great-looking thumbnails that will add to the look and feel of the Blog page of your website. Having a featured image that is named correctly will also increase your SEO ranking.
Part 5: Well Done on Creating your WordPress Website
I hope you had as much fun learning about WordPress as I had – demonstrating the usability of wordpress. WordPress is an exceptional piece of software, and I can only hope that this blog piece has convinced you enough to give it a fair try.
Over 30% of the websites on the internet have been built using the WordPress Builder, making it the standard for Search Engines like Google to follow; I hope to see you soon as a part of the growing wordpress community.
Author
Jasmeet is a founder of Lessons at Startup – A blog where he shares entrepreneurial stories. He specialises in Digital Marketing and Content Writing. He is addicted to Google News, Netflix, Good Coffee and Quora ☺.